Database connection and log4j integration
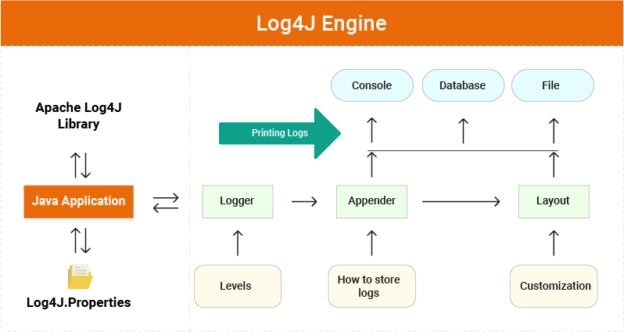
Integrating database connections and logging using Log4j in a servlet involves configuring a database connection pool, establishing connections in the servlet, and setting up Log4j for logging purposes.
1. Database Connection:
- Use a connection pool (e.g., Apache DBCP or HikariCP) to manage database connections efficiently.
- Configure the connection pool in a configuration file (e.g., context.xml or web.xml).
2. Log4j Integration
- Add Log4j dependencies to the project.
- Configure Log4j using a properties file or XML configuration file (e.g., log4j.properties or log4j.xml).

Table of Contents
Add Dependencies
Add dependencies for Log4j and a connection pool library (e.g., Apache DBCP) to your pom.xml (for Maven projects).
Example
xml
<dependencies>
    <!-- Log4j dependencies -->
    <dependency>
        <groupId>org.apache.logging.log4j</groupId>
        <artifactId>log4j-api</artifactId>
        <version>2.14.1</version>
    </dependency>
    <dependency>
        <groupId>org.apache.logging.log4j</groupId>
        <artifactId>log4j-core</artifactId>
        <version>2.14.1</version>
    </dependency>

    <!-- Apache DBCP dependencies -->
    <dependency>
        <groupId>org.apache.commons</groupId>
        <artifactId>commons-dbcp2</artifactId>
        <version>2.8.0</version>
    </dependency>
</dependencies>
Configure Database Connection Pool
Create a context.xml file in the META-INF directory to configure the connection pool.

xml
<Context>
    <Resource name="jdbc/MyDB"
              auth="Container"
              type="javax.sql.DataSource"
              maxTotal="20"
              maxIdle="10"
              maxWaitMillis="-1"
              username="dbuser"
              password="dbpassword"
              driverClassName="com.mysql.cj.jdbc.Driver"
              url="jdbc:mysql://localhost:3306/mydatabase"/>
</Context>
Configure Log4j
Create a log4j.properties file in the src/main/resources directory.

properties
 Define the root logger with appender file
log4j.rootLogger = DEBUG, FILE

 Define the file appender
log4j.appender.FILE = org.apache.log4j.FileAppender
log4j.appender.FILE.File = logs/application.log
log4j.appender.FILE.ImmediateFlush = true
log4j.appender.FILE.Threshold = debug
log4j.appender.FILE.Append = true
log4j.appender.FILE.layout = org.apache.log4j.PatternLayout
log4j.appender.FILE.layout.ConversionPattern = %d{yyyy-MM-dd HH:mm:ss} %-5p %c{1}:%L - %m%n
Example
Step 4: Implement the Servlet
Here is an example servlet that demonstrates how to use database connections and Log4j logging:

java
import java.io.IOException;
import java.io.PrintWriter;
import java.sql.Connection;
import java.sql.PreparedStatement;
import java.sql.ResultSet;
import javax.naming.Context;
import javax.naming.InitialContext;
import javax.servlet.ServletException;
import javax.servlet.annotation.WebServlet;
import javax.servlet.http.HttpServlet;
import javax.servlet.http.HttpServletRequest;
import javax.servlet.http.HttpServletResponse;
import javax.sql.DataSource;
import org.apache.logging.log4j.LogManager;
import org.apache.logging.log4j.Logger;

@WebServlet("/DatabaseServlet")
public class DatabaseServlet extends HttpServlet {
    private static final long serialVersionUID = 1L;
    private static final Logger logger = LogManager.getLogger(DatabaseServlet.class);
    private DataSource dataSource;

    public void init() throws ServletException {
        try {
            Context initContext = new InitialContext();
            Context envContext = (Context) initContext.lookup("java:/comp/env");
            dataSource = (DataSource) envContext.lookup("jdbc/MyDB");
        } catch (Exception e) {
            logger.error("Failed to initialize DataSource", e);
            throw new ServletException("Cannot initialize DataSource", e);
        }
    }

    protected void doGet(HttpServletRequest request, HttpServletResponse response) throws ServletException, IOException {
        response.setContentType("text/html");
        PrintWriter out = response.getWriter();
        Connection connection = null;
        PreparedStatement statement = null;
        ResultSet resultSet = null;

        try {
            connection = dataSource.getConnection();
            String sql = "SELECT * FROM mytable";
            statement = connection.prepareStatement(sql);
            resultSet = statement.executeQuery();

            out.println("<html><body>");
            out.println("<h1>Database Results</h1>");
            out.println("<table border='1'><tr><th>ID</th><th>Name</th></tr>");
            while (resultSet.next()) {
                int id = resultSet.getInt("id");
                String name = resultSet.getString("name");
                out.println("<tr><td>" + id + "</td><td>" + name + "</td></tr>");
            }
            out.println("</table></body></html>");

            logger.info("Data retrieved successfully from the database.");
        } catch (Exception e) {
            logger.error("Database connection or query failed", e);
            out.println("Error retrieving data from the database.");
        } finally {
            try {
                if (resultSet != null) resultSet.close();
                if (statement != null) statement.close();
                if (connection != null) connection.close();
            } catch (Exception e) {
                logger.error("Failed to close database resources", e);
            }
        }

        out.close();
    }
}
Explanation Database connection and log4j integration
- Database Configuration:
- context.xml defines the database connection pool parameters, including the database URL, credentials, and connection pool properties.
- Log4j Configuration:
- log4j.properties sets up the logging level, log file location, and log message format.
- Servlet Implementation:
- init() method initializes the DataSource by looking it up in the JNDI context.
- doGet() method obtains a connection from the connection pool, executes a query, and logs the process using Log4j.
- Logging:
- Log messages are generated using Log4j for successful data retrieval and error conditions.
