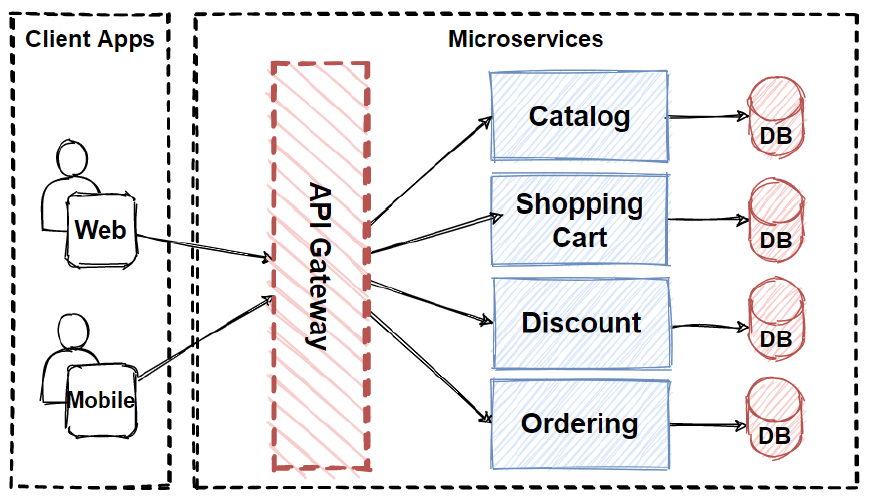
Steps to Develop an API Gateway
An API Gateway in a microservices architecture acts as a single entry point for all client requests. It routes requests to the appropriate microservice, aggregates responses, and handles cross-cutting concerns such as authentication, rate limiting, and monitoring. Spring Cloud Gateway is a popular framework for implementing API Gateways in Java Spring Boot applications.

Table of Contents
Steps to Develop an API Gateway Using Spring Cloud Gateway
- 1. Setup Spring Boot Application: Initialize a Spring Boot application with Spring Cloud Gateway dependency.
- 2. Configure Routes: Define routing rules in the application properties or YAML file.
- 3. Implement Filters: Use Spring Cloud Gateway filters to handle cross-cutting concerns. \
- 4. Run and Test: Start the application and test the routing functionality.
Example Implementation
Step 1: Setup Spring Boot Application
```xml
<dependencies>
    <dependency>
        <groupId>org.springframework.cloud</groupId>
        <artifactId>spring-cloud-starter-gateway</artifactId>
    </dependency>
    <dependency>
        <groupId>org.springframework.boot</groupId>
        <artifactId>spring-boot-starter-web</artifactId>
    </dependency>
    <dependency>
        <groupId>org.springframework.boot</groupId>
        <artifactId>spring-boot-starter</artifactId>
    </dependency>
</dependencies>

<dependencyManagement>
    <dependencies>
        <dependency>
            <groupId>org.springframework.cloud</groupId>
            <artifactId>spring-cloud-dependencies</artifactId>
            <version>Hoxton.SR12</version>
            <type>pom</type>
            <scope>import</scope>
        </dependency>
    </dependencies>
</dependencyManagement>
```
application.yml: Configure routes
```yaml
spring:
  cloud:
    gateway:
      routes:
        - id: user-service
          uri: http://localhost:8081
          predicates:
            - Path=/users/
        - id: order-service
          uri: http://localhost:8082
          predicates:
            - Path=/orders/
server:
  port: 8080
```
Step 2: Implement API Gateway
```java
package com.example.apigateway;

import org.springframework.boot.SpringApplication;
import org.springframework.boot.autoconfigure.SpringBootApplication;

@SpringBootApplication
public class ApiGatewayApplication {
    public static void main(String[] args) {
        SpringApplication.run(ApiGatewayApplication.class, args);
    }
}
```
Application Configuration (application.yml)
```yaml
spring:
  application:
    name: api-gateway
  cloud:
    gateway:
      routes:
        - id: user-service
          uri: http://localhost:8081
          predicates:
            - Path=/users/
        - id: order-service
          uri: http://localhost:8082
          predicates:
            - Path=/orders/
server:
  port: 8080
```
Step 3: Implement Filters
```java
package com.example.apigateway.filters;

import org.springframework.cloud.gateway.filter.GatewayFilter;
import org.springframework.cloud.gateway.filter.factory.AbstractGatewayFilterFactory;
import org.springframework.stereotype.Component;
import org.springframework.web.server.ServerWebExchange;
import reactor.core.publisher.Mono;

@Component
public class LoggingFilter extends AbstractGatewayFilterFactory<Object> {

    @Override
    public GatewayFilter apply(Object config) {
        return (exchange, chain) -> {
            System.out.println("Request Path: " + exchange.getRequest().getURI().getPath());
            return chain.filter(exchange).then(Mono.fromRunnable(() -> {
                System.out.println("Response Status Code: " + exchange.getResponse().getStatusCode());
            }));
        };
    }
}
```
GatewayConfiguration.java: Register the filter
```java
package com.example.apigateway.config;

import com.example.apigateway.filters.LoggingFilter;
import org.springframework.context.annotation.Bean;
import org.springframework.context.annotation.Configuration;
import org.springframework.cloud.gateway.filter.factory.AbstractGatewayFilterFactory;

@Configuration
public class GatewayConfiguration {

    @Bean
    public LoggingFilter loggingFilter() {
        return new LoggingFilter();
    }
}
```
Step 4: Run and Test
Run the Application:
```bash
mvn spring-boot:run
```
Testing the API Gateway:
- Start the UserService and OrderService applications on ports 8081 and 8082 respectively.
- Access the API Gateway at `http://localhost:8080/users/1` to route to UserService.
- Access `http://localhost:8080/orders/1` to route to OrderService.
Advantages of Using API Gateway
- Centralized Entry Point: Simplifies client communication by providing a single entry point.
- Cross-Cutting Concerns: Manages security, logging, and rate limiting centrally.
- Scalability: Easily manage and scale microservices without changing client logic.
Disadvantages of Using API Gateway
- Single Point of Failure: The gateway can become a bottleneck.
- Latency: Additional hop can introduce latency.
- Complexity: Requires careful configuration and management.
